Sale
")

")

")
")

")

")
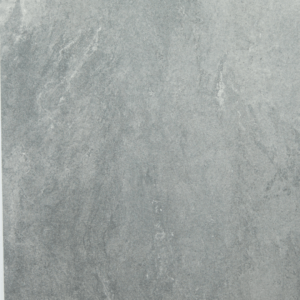
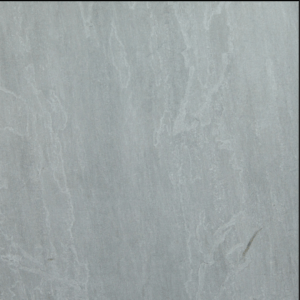
Kandla Grey (20mm) Porcelain 600×900 – 21.60 Sq.m.
Original price was: £24.50.£19.50Current price is: £19.50. + VAT
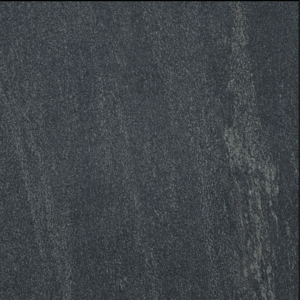
Kandla Grey Porcelain is a high-quality porcelain tile that mimics the natural look of Kandla Grey sandstone. With its subtle shades of grey and natural stone-like texture, this tile is a great choice for those who want the look of natural stone without maintenance.
- 1 Pallet = 40 Slabs
- 1 Slab = 0.54 Sq.m.
- Total Pallet Size= 21.60 Sq.m.
Kandla Grey Porcelain Paving
- R11 Non-Slip Rating
- Low Maintenance
- Stain, Scratch & Shock Resistant
- Hard-Wearing & Highly Durable
- CE Approved
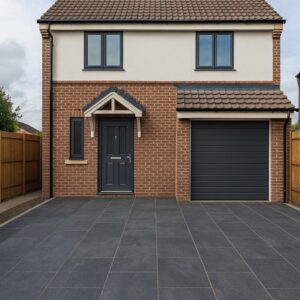
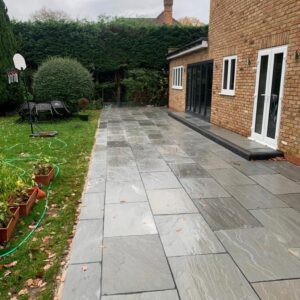
Kandla Grey Porcelain Paving: The Perfect Blend of Natural Aesthetics and Modern Convenience
Kandla Grey Porcelain Paving is meticulously crafted to replicate the look of natural stone, featuring varying grey tones and a surface that mirrors the texture of naturally riven stone.
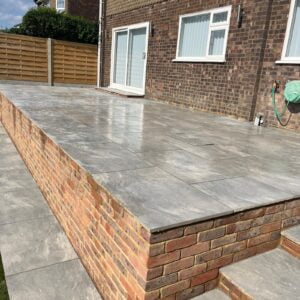
Each porcelain slab combines the timeless appeal of natural stone with the benefits of modern, vitrified paving. The flat, lightly textured, non-slip surface enhances safety, making it ideal for family gardens and larger commercial projects by maintaining grip even when wet. With an R11 non-slip rating, these slabs are perfect for patios, pathways, driveways, and even around swimming pools or water features.
Engineered for durability, outdoor porcelain paving boasts a robust, stain-resistant, and scratch-resistant surface, making it a low-maintenance option. The non-porous nature of the slabs prevents moisture buildup, reducing the risk of moss or algae growth.
No need to worry about heavy rain or accidental spills—these tiles can be easily wiped clean with a damp cloth, saving you time and effort. Additionally, porcelain’s resistance to fading ensures the slabs retain their original color, even under intense heat and sunlight during summer months.
| Delivery | Free delivery available to most mainland UK. Delivery fee will be charged outside free delivery areas. See our delivery section for more information. |
| Texture | R11 Matt anti-slip |
| Thickness | 20mm |
| Pack Size | 40 slabs of 600x900mm providing 21.6m2 coverage |
| Material | Vitrified Porcelain / CE Certified |
- 1 Pallet = 40 Slabs
- 1 Slab = 0.54 Sq.m.
- Total Pallet Size= 21.60 Sq.m.
| Dimensions | 21.60 cm |
|---|---|
| THICKNESS | |
| SIZE & PACKS |
3 reviews for Kandla Grey (20mm) Porcelain 600×900 – 21.60 Sq.m.
- ColorGreyApplicationOutdoorFinishMatteWidth600 mmSize20 mmLength900 mmTagsOutdoor SpacesOutdoorProject TypeResidentialCollection TagOutdoor Porcelain Tiles
Related products
- Outdoor p
Anthracite (20 MM) Porcelain 600×900 – 28.08 Sq.mt.
Original price was: £25.50.£19.50Current price is: £19.50. + VATAnthracite Grey Dark is a high-quality porcelain tile that offers a sleek and modern look. With its dark grey colour, it adds a touch of sophistication to any space. The tile is designed with a matte finish, making it an excellent choice for those who want the look of natural stone without maintenance.
- Outdoor p
Everest Pearl Porcelain 600×900 (20mm) 21.60 sq.mt.
Original price was: £25.50.£19.50Current price is: £19.50. + VATEverest Pearl Porcelain Tiles are the epitome of clean and crisp design. These tiles reflect natural light beautifully, making your space feel more open and inviting.
Price Mentioned is for 1 Pallet Equivalent to 21.60 sq.m.
- Outdoor p
Earthstone Grey Porcelain 600×900 (20mm) 21.60 Sq.m.
Original price was: £25.50.£19.50Current price is: £19.50. + VATEarthy tones and a textured finish make Earthstone Grey Porcelain Tiles an inviting choice for outdoor spaces. These tiles seamlessly blend with nature.
- Outdoor p
Lava Grey Porcelain 600×900 (16mm) 28.08 sq.mt.
Original price was: £25.50.£19.50Current price is: £19.50. + VATLava Grey Porcelain Tiles are the epitome of clean and crisp design. These tiles reflect natural light beautifully, making your space feel more open and inviting.
Price Mentioned is for 1 Pallet Equivalent to 21.60 sq.m.
- Outdoor Porcelain
Kandla Grey (22mm) Sandstone 900×600 Slabs Size 18.9 sq. mt.
Original price was: £22.20.£19.50Current price is: £19.50. + VATOur high quality Kandla Grey Sandstone Paving Slabs are truly an unparalleled choice, delivering a perfect mix of versatility, aesthetics and practicality.
- Outdoor Porcelain
Raj Green (18 mm) Mixed Patio Pack Size 20.80 sq.m.
Original price was: £20.40.£19.50Current price is: £19.50. + VATIntroducing the Raj Green Mixed Patio Pack, a versatile and eye-catching natural stone option for creating stunning outdoor spaces. This patio pack features a blend of different hues of Raj Green sandstone, offering a unique and diverse colour palette that adds character and charm to any outdoor area.


Michael & Sarah, UK –
“Stunning Addition to Our Patio!”
We installed Kandla Grey Sandstone on our patio, and it looks absolutely stunning! The natural variation in colors gives a premium and rustic feel. It blends beautifully with our garden. Highly recommend!
Emily J., UK –
“Perfect for Our Outdoor Pathway”
The quality of the sandstone is top-notch! We used it for our outdoor walkway, and it has completely transformed the entrance of our home. It’s durable and slip-resistant, which is great for rainy days.
Sarah –
“Stunning Addition to Our Patio!”
We installed Kandla Grey Sandstone on our patio, and it looks absolutely stunning! The natural variation in colors gives a premium and rustic feel. It blends beautifully with our garden. Highly recommend!
— Michael & Sarah, UK